3

I have created split button i.e. button with options as below.

  1. Created block file

    namespace Yournamespace\Modulename\Block\Adminhtml\Product;
    
    class CustomActionList extends \Magento\Backend\Block\Widget\Container
    {
    
        /**
         * @param \Magento\Backend\Block\Widget\Context $context
         * @param array $data
         */
        public function __construct(
            \Magento\Backend\Block\Widget\Context $context,
            array $data = []
        ) {
            parent::__construct($context, $data);
        }
    
        protected function _prepareLayout()
        {
            $addButtonProps = [
                'id' => 'custom_action_list',
                'label' => __('Custom Action List'),
                'class' => 'add',
                'button_class' => '',
                'class_name' => 'Magento\Backend\Block\Widget\Button\SplitButton',
                'options' => $this->_getCustomActionListOptions(),
            ];
            $this->buttonList->add('add_new', $addButtonProps);
    
            return parent::_prepareLayout();
        }
    
        /**
         * Retrieve options for 'CustomActionList' split button
         *
         * @return array
         */
        protected function _getCustomActionListOptions()
        {
            /*list of button which you want to add*/
            $splitButtonOptions=[
            'action_1'=>['label'=>__('Action 1'),'onclick'=>'setLocation("ACTION CONTROLLER")'],
            'action_2'=>['label'=>__('Action 2'),'onclick'=>'setLocation("ACTION CONTROLLER")'],
            'action_3'=>['label'=>__('Action 3'),'onclick'=>'setLocation("ACTION CONTROLLER")']
            ];
            /* in above list you can also pass others attribute of buttons*/
            return $splitButtonOptions;
        }
    }
    
  2. Created block file

    <?xml version="1.0"?>
    <page xmlns:xsi="http://www.w3.org/2001/XMLSchema-instance" xsi:noNamespaceSchemaLocation="urn:magento:framework:View/Layout/etc/page_configuration.xsd">
        <body>
            <referenceContainer name="content">
                <!-- here we call our split button block   -->
                <block class="Yournamespace\Modulename\Block\Adminhtml\Product\CustomActionList" name="admin.product.customsplitbutton"/>
            </referenceContainer>
        </body>
    </page>
    

I am using this button in grid, beside Add New button enter image description here.
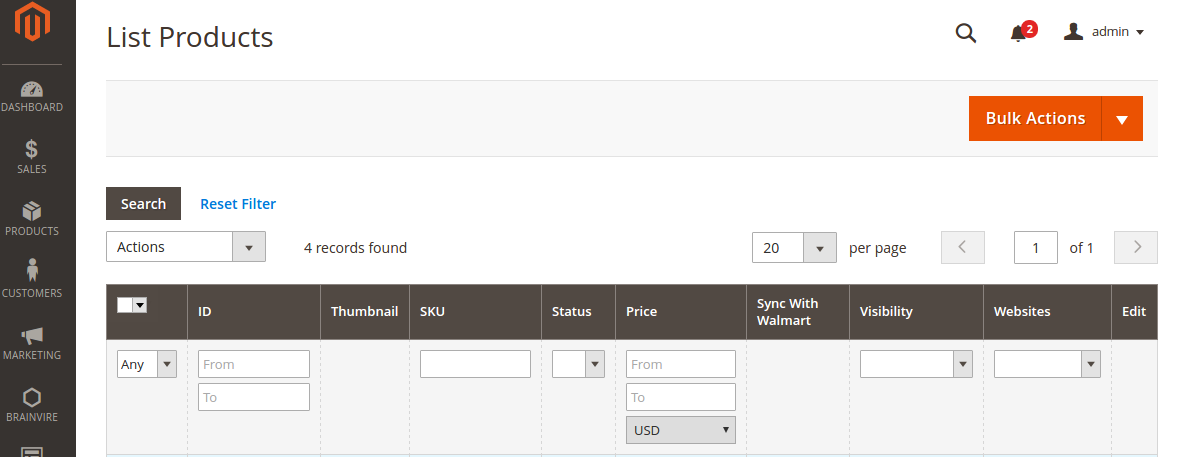
But when I select items from grid and I click on button action, I am not getting selected row's data.

1 Answer 1

2

Try this

[vendor_name] / [module_name] /view/adminhtml/layout

yourLayoutFileName.xml

<?xml version="1.0"?>
<page xmlns:xsi="http://www.w3.org/2001/XMLSchema-instance" xsi:noNamespaceSchemaLocation="../../../../../../../lib/internal/Magento/Framework/View/Layout/etc/page_configuration.xsd">
    <body>
        <referenceContainer name="content">
            <block class="[vendor_name]\ [module_name] \Block\Adminhtml\[LayouBlockFileName]" name="block_file_name"/>
        </referenceContainer>
    </body>
</page>

now create a block file

[vendor_name]\ [module_name] \Block\Adminhtml

LayouBlockFileName.php

<?php

namespace [vendor_name]\[module_name]\Block\Adminhtml;

class LayouBlockFileName extends \Magento\Backend\Block\Widget\Container
{
    protected $_template = 'blocklayouts/blocklayouts.phtml';

    public function __construct(\Magento\Backend\Block\Widget\Context $context,array $data = [])
    {
        parent::__construct($context, $data);
    }


    protected function _prepareLayout()
    {
        $this->buttonList->add(
            '<Simple_button_name>',
            [
                'label' => __('Simple Button'),
                'class' => 'primary',
                'onclick' => 'setLocation(\'' . $this->getUrl('[route_name]/[controller_name]/[filename]') . '\')',
            ]
         );

        $addButtonProps = [
            'id' => '<Split_button_name>',
            'label' => __('SplitButton'),
            'class' => 'add',
            'button_class' => '',
            'class_name' => 'Magento\Backend\Block\Widget\Button\SplitButton',
            'options' => $this->_getAddButtonOptions(),
        ];

        $this->buttonList->add('<Split_Button_Name>', $addButtonProps);

        $this->setChild(
            'grid_filename',
            $this->getLayout()->createBlock('[vendor_name]\[module_name]\Block\Adminhtml\[LayouBlockFileName]\Grid_filename', '[block_file_name]')
        );
        return parent::_prepareLayout();
    }

    protected function _getAddButtonOptions()
    {
        // you can pass multiple option here 

        $splitButtonOptions[] = [
            'label' => __('<splitButtonOptionName>'),
            'onclick' => "setLocation('" . $this->_getCreateUrl() . "')"
        ];

        return $splitButtonOptions;
    }

    protected function _getCreateUrl()
    {
        return $this->getUrl(
            '[route_name]/[controller_name]/[filename]'
        );
    }

    public function getGridHtml()
    {
        return $this->getChildHtml('grid_filename');
    }

}

in above grid_filename is file where you creating an Column for grid type your file name

now create a templet file

[vendor_name][module_name]\Block\Adminhtml\templates\blocklayouts

blocklayouts.phtml

<?php echo $block->getGridHtml() ?>

now run this command

php bin/magento set:up
php bin/magento c:f

now run your Admin Grid

I Hope This Helps You.

0

Your Answer

By clicking “Post Your Answer”, you agree to our terms of service and acknowledge you have read our privacy policy.

Not the answer you're looking for? Browse other questions tagged or ask your own question.