1

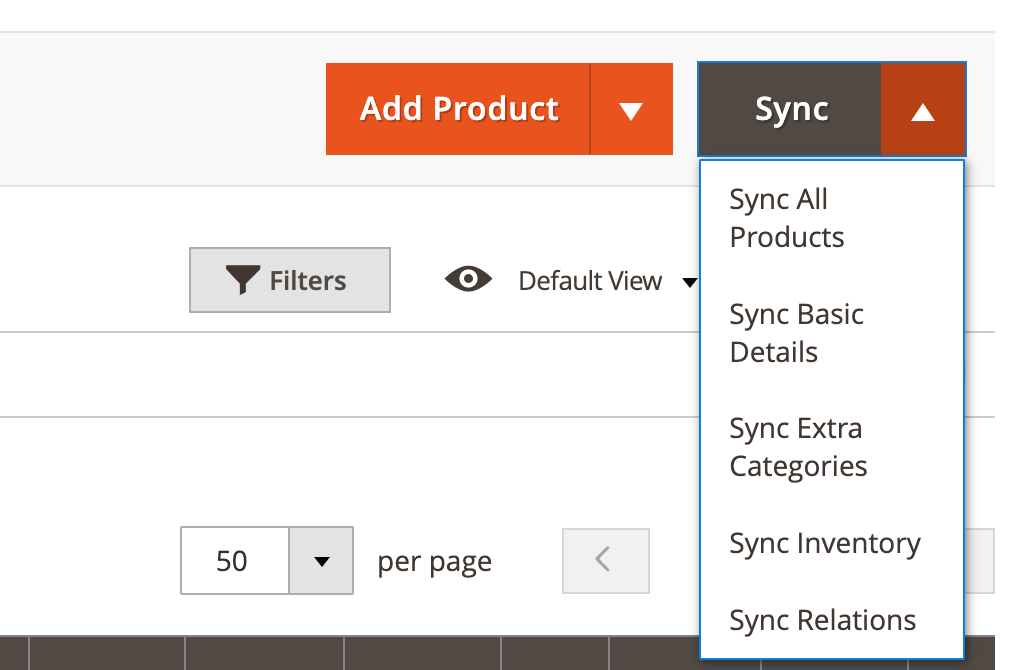
I have created some buttons on catalog product admin page. I would like to group them in a dropdown (split) button like the Add Product button. Can you please help?

enter image description here

My product_listing.xml below

<?xml version="1.0" encoding="UTF-8"?>
<listing xmlns:xsi="http://www.w3.org/2001/XMLSchema-instance" xsi:noNamespaceSchemaLocation="urn:magento:module:Magento_Ui:etc/ui_configuration.xsd">
    <argument name="data" xsi:type="array">
        <item name="buttons" xsi:type="array">
            <item name="productssync" xsi:type="array">
                <item name="name" xsi:type="string">productssync</item>
                <item name="label" xsi:type="string" translate="true">Sync All Products</item>
                <item name="class" xsi:type="string">secondary</item>
                <item name="url" xsi:type="string">sandy_erpsyncbuttons/product/productssync</item>
            </item>
            <item name="basicdetailssync" xsi:type="array">
                <item name="name" xsi:type="string">basicdetailssync</item>
                <item name="label" xsi:type="string" translate="true">Sync Basic Details</item>
                <item name="class" xsi:type="string">secondary</item>
                <item name="url" xsi:type="string">sandy_erpsyncbuttons/product/basicdetailssync</item>
            </item>
            <item name="extracategoriessync" xsi:type="array">
                <item name="name" xsi:type="string">extracategoriessync</item>
                <item name="label" xsi:type="string" translate="true">Sync Extra Categories</item>
                <item name="class" xsi:type="string">secondary</item>
                <item name="url" xsi:type="string">sandy_erpsyncbuttons/product/extracategoriessync</item>
            </item>
            <item name="inventorysync" xsi:type="array">
                <item name="name" xsi:type="string">inventorysync</item>
                <item name="label" xsi:type="string" translate="true">Sync Inventory</item>
                <item name="class" xsi:type="string">secondary</item>
                <item name="url" xsi:type="string">sandy_erpsyncbuttons/product/inventorysync</item>
            </item>
            <item name="relationssync" xsi:type="array">
                <item name="name" xsi:type="string">relationssync</item>
                <item name="label" xsi:type="string" translate="true">Sync Relations</item>
                <item name="class" xsi:type="string">secondary</item>
                <item name="url" xsi:type="string">sandy_erpsyncbuttons/product/relationssync</item>
            </item>
        </item>
    </argument>
</listing>

1 Answer 1

1

You need to use Magento\Backend\Block\Widget\Button\SplitButton for class_name.

In case you need to create additional button class

app/code/Acme/StackExchange/view/adminhtml/ui_component/product_listing.xml

<?xml version="1.0" encoding="UTF-8"?>
<listing xmlns:xsi="http://www.w3.org/2001/XMLSchema-instance"
         xsi:noNamespaceSchemaLocation="urn:magento:module:Magento_Ui:etc/ui_configuration.xsd">
    <argument name="data" xsi:type="array">
        <item name="buttons" xsi:type="array">
            <item name="sync" xsi:type="string">Acme\StackExchange\Ui\Component\Control\Button\Sync</item>
        </item>
    </argument>
</listing>

app/code/Acme/StackExchange/Ui/Component/Control/Button/Sync.php

<?php
declare(strict_types=1);

namespace Acme\StackExchange\Ui\Component\Control\Button;

use Magento\Backend\Block\Widget\Button\SplitButton;
use Magento\Backend\Block\Widget\Context;
use Magento\Framework\View\Element\UiComponent\Control\ButtonProviderInterface;

class Sync implements ButtonProviderInterface
{
    protected Context $context;

    public function __construct(
        Context $context
    ) {
        $this->context = $context;
    }

    /**
     * @inheritDoc
     */
    public function getButtonData(): array
    {
        return [
            'id'           => 'acme_sync',
            'label'        => __('Sync'),
            'class'        => 'secondary',
            'button_class' => 'sync',
            'class_name'   => SplitButton::class,
            'options'      => $this->getOptions(),
            'sort_order'   => 5,
        ];
    }

    protected function getOptions(): array
    {
        return [
            'productssync' => [
                'label' => __('Sync All Products'),
                'default' => true,
                'onclick' => $this->getOnClickUrl('sandy_erpsyncbuttons/product/productssync')
            ],
            'basicdetailssync' => [
                'label' => __('Sync Basic Details'),
                'onclick' => $this->getOnClickUrl('sandy_erpsyncbuttons/product/basicdetailssync')
            ],
            'extracategoriessync' => [
                'label' => __('Sync Extra Categories'),
                'onclick' => $this->getOnClickUrl('sandy_erpsyncbuttons/product/extracategoriessync')
            ],
            'inventorysync' => [
                'label' => __('Sync Inventory'),
                'onclick' => $this->getOnClickUrl('sandy_erpsyncbuttons/product/inventorysync')
            ],
            'relationssync' => [
                'label' => __('Sync Relations'),
                'onclick' => $this->getOnClickUrl('sandy_erpsyncbuttons/product/relationssync')
            ],
        ];
    }

    protected function getOnClickUrl(string $path, array $params = []): string
    {
        return sprintf("setLocation('%s')",
            $this->context->getEscaper()->escapeUrl(
                $this->context->getUrlBuilder()->getUrl($path, $params)
            )
        );
    }
}

You can set default for one of children, and if you are not set default - noone action will be fired on click without select action.

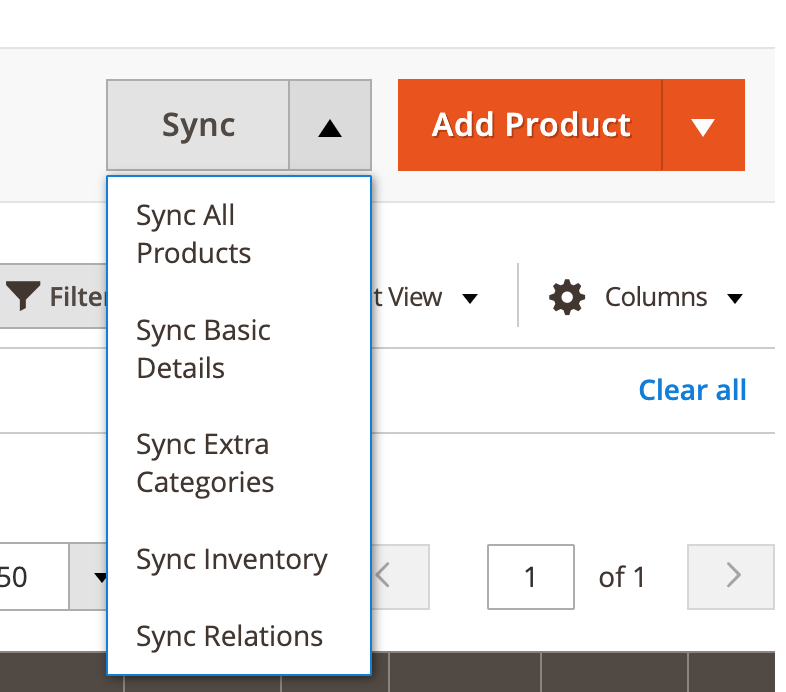
Result

For reorder Add product button you need to add custom CSS, in case SplitButton class add actions-split class to button container. Alternative is create custom class and extend SplitButton, but anyway you need to add some extra styles.

Some example of CSS in less

    .actions-split.sync {
        .lib-vendor-prefix-order(1);
        &:hover, &.active, &._active {
            box-shadow: none;
        }
        button.secondary {
            background-color: #e3e3e3;
            border-color: #adadad;
            color: #514943;
            text-shadow: none;
            &:hover {
                box-shadow: none;
                background-color: #dbdbdb;
            }
            &:after {
                border-color: #000000 transparent transparent transparent;
            }
        }
    }

enter image description here

enter image description here

1
  • Thank you very much, it worked.
    – Sandy
    Commented Aug 8, 2022 at 18:10

Your Answer

By clicking “Post Your Answer”, you agree to our terms of service and acknowledge you have read our privacy policy.

Not the answer you're looking for? Browse other questions tagged or ask your own question.