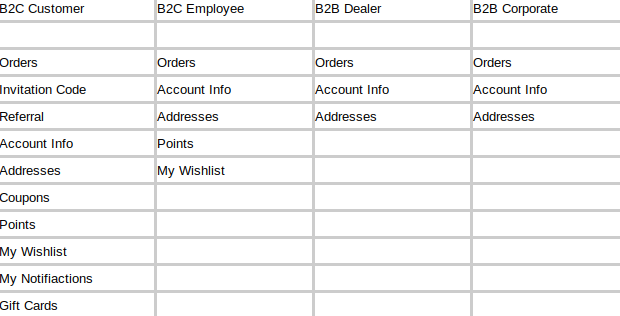
Here, I'll explain you this with one example.
We will need to display My Wishlist link only for B2C Customer and B2C Employee customer groups and not in B2B Dealer and B2B Corporate.
- All Sidebar links, we can find here in
customer_account.xml in different modules under customer_account_navigation container.
Like if you want to find My Wishlist link then you check this file..
vendor/magento/module-wishlist/view/frontend/layout/customer_account.xml
My Account link located here in this file..
vendor/magento/module-customer/view/frontend/layout/customer_account.xml
My Orders link located here in this file..
vendor/magento/module-sales/view/frontend/layout/customer_account.xml
- So I think now you get idea how sidebar links are working. And you need to add any new links there then you can add that there.
So we will create this file here
app/design/frontend/Vendor/Theme/Magento_Theme/layout/customer_account.xml
Here we need to change Class name for wishlist link and we will add new Class name there. So we can not change class name with referenceBlock so we will override class with block itself. So just copy entire block from there and add that in custom theme's customer_account.xml file and update your class name.
Content for above file is ...
<?xml version="1.0"?>
<page xmlns:xsi="http://www.w3.org/2001/XMLSchema-instance" xsi:noNamespaceSchemaLocation="urn:magento:framework:View/Layout/etc/page_configuration.xsd">
    <body>
        <referenceBlock name="customer_account_navigation">
            <block class="Vendor\Module\Block\Account\WishlistLink" ifconfig="wishlist/general/active" name="customer-account-navigation-wish-list-link">
                <arguments>
                    <argument name="path" xsi:type="string">wishlist</argument>
                    <argument name="label" xsi:type="string" translate="true">My Wish List</argument>
                    <argument name="sortOrder" xsi:type="number">210</argument>
                </arguments>
            </block>
        </referenceBlock>
    </body>
</page>
- Here I've changed Block's class name from
Magento\Customer\Block\Account\SortLinkInterface to Vendor\Module\Block\Account\WishlistLink.
So now we need to create one Block file in our custom module here
app/code/Vendor/Module/Block/Account/WishlistLink.php
Content for this file is ..
<?php
namespace Vendor\Module\Block\Account;

class WishlistLink extends \Magento\Framework\View\Element\Html\Link\Current
{
    protected $_customerSession;

    protected $customerGroup;

    public function __construct(
        \Magento\Framework\View\Element\Template\Context $context,
        \Magento\Framework\App\DefaultPathInterface $defaultPath,
        \Magento\Customer\Model\Session $customerSession,
        \Magento\Customer\Model\ResourceModel\Group\Collection $customerGroup,
        array $data = []
     ) {
         $this->_customerSession = $customerSession;
         $this->customerGroup = $customerGroup;
         parent::__construct($context, $defaultPath, $data);
     }

    protected function _toHtml()
    {
        $customerGroupId = $this->_customerSession->getCustomerGroupId();
        $customerGroups = $this->customerGroup->toOptionArray();

        foreach ($customerGroups as $customerGroup) {
            if($customerGroup['value'] == $customerGroupId){
                $currentCustomerGroup = $customerGroup['label'];
            }
        }

        if($this->_customerSession->isLoggedIn()) {
            if(in_array($currentCustomerGroup, array("B2C Customer", "B2C Employee"))) {
                return parent::_toHtml();
            } else {
                return;
            }
        }
        return;
    }
}
- Here in this file I've added Customer Group's Condition. So now if any customer has
B2C Customer and B2C Employee Group that customer only can see "My Wishlist" link in account dashboard page.
You can do same thing for different links same as above. You can create different Block files and you can override multiple block's class name in xml file.
Hope this will help you!

