Magento 2 uses OAuth 1.0 based authentication for web APIs. At the first instance by looking on the documentation you will feel messed up. But if you have somewhat background of OAuth, you will easily guess what is next and why it is !!
Let us understand it step by step (You can skip the steps you have already done or understand to proceed):
Step 1: Login to Admin Panel and Go to Admin Panel -> System -> Integrations -> Add New Integration
Here provide the Integration Details and Check the APIs which you want to be accessible using this integration. Here it is in more detail.
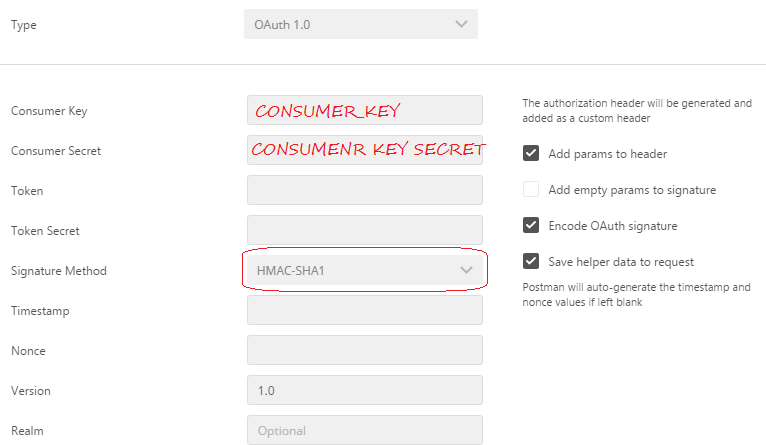
Store the CONSUMER_KEY and CONSUMER_KEY_SECRET. We will use it in next step.
Step 2. Open REST Client (For Example: Postman Rest Client). Send the request
POST http://mywebsite.com/oauth/token/request

Add the headers Content-Type and Accept with value application/json
And hit [Send].
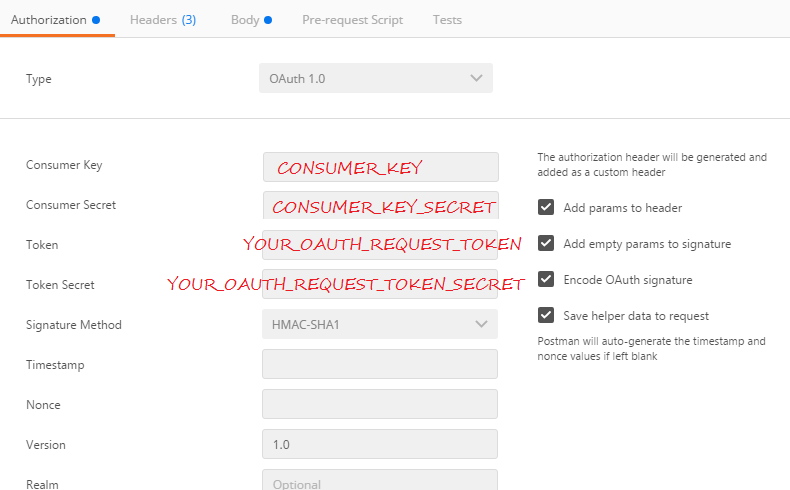
You will receive a response oauth_token=YOUR_OAUTH_REQUEST_TOKEN&oauth_token_secret=YOUR_OAUTH_REQUEST_TOKEN_SECRET.
This is a temporary token you can use to communicate further.
where this verifier token comes from. I would presume it comes from the request for an access token, but the documentation doesn't reflect this.
Step 3 [A]. Getting the access token. Here is the twist. The Magento framework relies on three types of requests;
- Admin
- Customer
- Guest
Guest is the least privileged user, and can access only public/anonymous APIs. Let us suppose I am a customer, and I want to get authenticated. There comes a point in sudden Show me you are my customer/Provide credentials. Now customer needs to login.
POST http://mywebsite.com/rest/V1/integration/customer/token

Move to Body tab and select Raw radio button and JSON(application/json). Fill the login credential payload
{
"username":"[email protected]",
"password":"mypassword"
}
Now click on [Send].
Voila !!! Here it is. The response you just received was verifier_key, that you were scratching head for. Now you may be feeling comfortable. And will guess the next step.
Step 3 [B]. The current version of POSTMAN client is unable to set the VERIFIER_KEY in Authorization header. So you will need to use cURL client tool. These steps are some what cumbersome, but currently i felt it is the only way to demonstrate here.
POST http://mywebsite.com/oauth/token/access
In postmain rest client fill the form same as Step 3 [A]. Now click on [code] as shown in snapshot. From the pop up select cURL and click Copy To Clipboard.

Open online cURL client tool. I have used http://onlinecurl.com/. Update the Authorization header by appending the oauth_verifier as below:
Authorization: OAuth oauth_signature_method="HMAC-SHA1", oauth_consumer_key="your_consumer_key", oauth_version="1.0", oauth_timestamp="1482575080", oauth_nonce="2142790194", oauth_verifier="THE_OAUTH_VERIFIER_YOU_RECEIVED", oauth_token="your_oauth_request_token", oauth_signature="HMAC-SHA1_SIGNATURE_GENERATED_BY_POSTMAN_CLIENT"
The response will look like this:
oauth_token=access_oauth_token&oauth_token_secret=access_oauth_token_secret
Now you can use this token for furgther communication.
Note: Similarly Admin also gets authentication except he uses the integration/admin/token url to login.


