I'm trying to set up the robots.txt on our Magento store. Actually, I do not really have any idea how to do that, so I need the help of any SEO or an experienced person who can help me with this.
3 Answers
The robots.txt is basically a file that tells all search engine crawlers which URLs they can access on your website or eCommerce store.
You can also keep single or multiple web pages out of Google by block indexing using noindex.
Below, we’ll show you exactly how to set up robots.txt in Magento 2. After that, we will also show you how to configure robots.txt in your Magento 2 store.
STEP-BY-STEP PROCESS TO SET UP ROBOTS.TXT IN MAGENTO 2
Please follow the below steps to learn how to set up robots.txt in Magento 2.
STEP – 1
First of all, log in to your admin panel and navigate to Stores > Settings > Configuration.
STEP – 2 After that, select XML Sitemap in the Catalog tab.
STEP – 3
Next, open the Search Engine Submission Settings section and select YES in the Enable Submission to Robots.txt field.
STEP – 4 Finally, click on the Save Config button to finish the process.
STEP-BY-STEP PROCESS TO CONFIGURE ROBOTS.TXT IN MAGENTO 2 Please follow the below steps to learn how to configure robots.txt in your Magento 2 store.
STEP – 1
First of all, log in to your admin panel and navigate to Content > Design> Configuration.
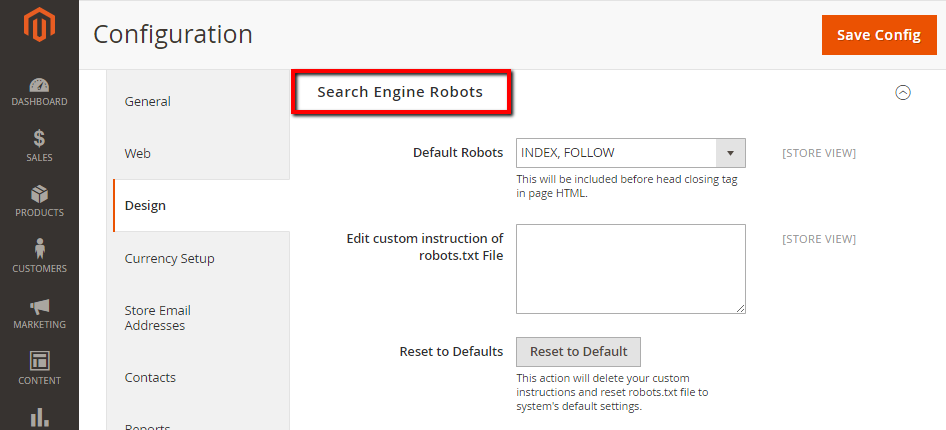
STEP – 2 After that, find the Global line, click on the Edit button, and open the Search Engine Robots section.
STEP – 3 Next, select the Default Robots as per your requirements from the following options.
INDEX, FOLLOW: Search engine crawler will regularly index your pages and update the changes.
INDEX, NOFOLLOW: Search engine crawler will index your store once but will not come back to update the changes.
NOINDEX, FOLLOW: Search engine crawlers won’t index your website. It’ll only monitor changes.
NOINDEX, NOFOLLOW: Search engine crawler will hide your website or eCommerce store from search engine.
STEP – 4 Now, write any custom instructions if you want to in the Edit custom instruction of robots.txt file.
STEP – 5 If you want to remove custom instructions and simply apply the default settings, click on the Reset to Default button.
STEP – 6 Finally, click on the Save Config button to finish the process.
From Magento 2 Admin, go to Content > Design > Configuration. Edit the website of choice.
Search Engine Robots contains options for robots.txt.
Magento creates the file automatically. You might need to flush the cache or re-deploy static content.
Example:
Default Robots:
INDEX, FOLLOW
Edit custom instruction of robots.txt File:
User-agent: *
Disallow: /checkout
Disallow: /checkout/*
Disallow: /customer/*
As Magento 2 provides a mechanism for creating a robots.txt file, there is no need to manually create one. All you need to do is add some configuration in Nginx and Magento itself and a robots.txt will be generated periodically using cron.
Generate a Robot.txt in Magento
To generate a robots.txt file, use the following steps:
Log into your Magento admin backend Select Store -> Configuration
Select General -> Design Select the dropdown Search Engine Robots.
Select the default storefront or one you want to create a robots.txt for.
    For Default Robots, use one of the available options:
    INDEX, FOLLOW: Tell crawlers to index the site and to keep doing this periodically.
    NOINDEX, FOLLOW: Tell crawlers not to index the site but to check for changes of this policy periodically.
    INDEX, NOFOLLOW: Tell crawlers to index the shop just once and don’t check for changes periodically.
    NOINDEX, NOFOLLOW: Tell crawlers not to index the shop and don’t check for changes periodically.
After this is done, click the Reset to Default button to add the default robots.txt instructions to the custom instructions field. You can now add your custom instructions to the default. After editing, click the Save Config button to save your robots.txt file to disk.
-
Almost everything about this answer is wrong - an unnecessary mention of configuring nginx with no further explanation, navigation steps through the admin are wrong, even the description of what NOINDEX and NOFOLLOW mean is wrong. I'm also fairly sure the file is supposed to get created in real time when you click save and is nothing to do with cron. Pick either of the 2 other answers instead. Commented Apr 26, 2023 at 11:15
-
@DougMcLean I attached image for your information. What you mean by wrong step? And tell me then whats no index no follow mean? Commented May 7, 2023 at 17:57

